I am about to build a small offgrid solar array and battery energy storage system. That’s something I am working towards since the beginning of the year. It involved tearing down a 50+ year old leaky shed full of spiders, which meant scraping of an asbestos roof, realising that it actually is asbestos and let professionals continue, and move about 10m³ of waste out of the garden colony. Now that the new shed is built and most of the energy equipment arrived, a post about my approach is due. A 21m² garden shed doesn’t warrent a name, so naturally I gave it one: Château Voltaire.
I want to build energy infrastructure on a commercial or industrial scale. That has to start somewhere, and apparently it starts with an asbestos roof and 10m³ of waste. Given I am located in Germany there are a lot of regulations to follow. You aren’t allowed to work on systems connected to the electrical grid unless you are a certified tradesperson being the number one obstacle. Being offgrid enables me as an educated and motivated hobbyist to get started.
Everything that follows are my overengineered thoughts and approaches to getting electricity all year round to power
- kettle (who doesn’t like coffee through an Aero Press?)
- fridge (who doesn’t like a cold drink?)
- power tools
- two surveillance cameras
- monitoring infrastructure
- still have enough headroom to run fun experiments like offgrid Crypto mining for heating or getting hot running water
- …and translate at least some of the learning to larger scale systems.
Energy Equipment
The heart of my system will be the newly released Victron Energy EasySolar-II GX 4k5 paired with a Pylontech US5000 48V LFP battery having 4.8kWh of storage capacity, powered by eight JA Solar JAM60D41-500/LB 500W bifacial solar panels.
I was rather quick to land at that combination: both Victron Energy and Pylontech endorse the component combination. Victron Energy has a strong open source and open protocol stance, which should make later monitoring and control integration manageable. This new version of the EasySolar-II has a higher continuous power output compared to the previous versions.
Let’s run through some of my major decisions and calculations, each accompanied by a brief explanation of how I arrived at my conclusions.
The Panels
While I didn’t want to build a new shed in the first place, the rotten walls and roof of the previous one enabled me to choose a new shed that’s actually great for solar panels. I landed at a model that has two rooms one to live in and one to house all electric equipment.
But most importantly it has 21m² roof area with a 2.2° slope facing south; at -1° azimuth to be precise. The roof angle isn’t ideal but easy to work on and in combination with rails mounted on slightly offset heights I expect a 4° angle. There is no shading all year round.
The results from the Photovoltaic Geographical Information System (PVGIS) of the European Commission indicate that the system is well over-spec’ed from spring through autumn. This information is what made me consider the almost flat slope of the roof in the first place. Having ~76kWh expected production in an average winter month should still cover running the monitoring equipment on most days. In summer running an AC wouldn’t be a problem, while still keeping the battery charged.
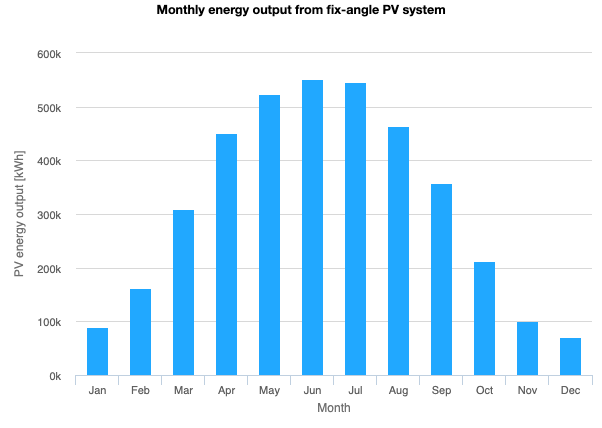 Expected monthly energy output.
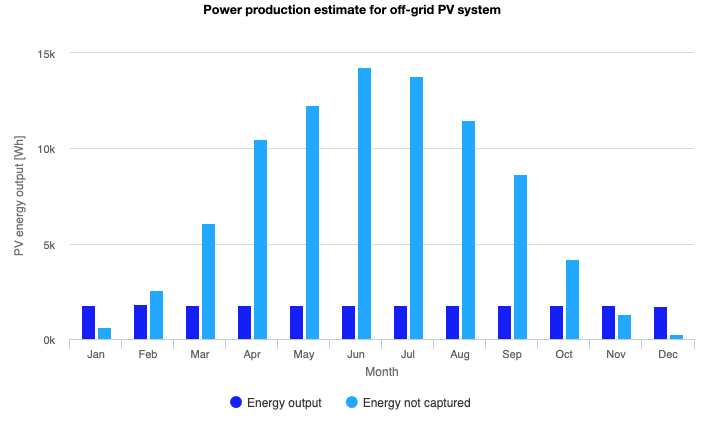 Share of the available energy the off-grid system cannot capture.
Full details can be found in the grid-connected and off-grid performance estimates. PVGIS is an awesome free resource!
The Array
All solar panels sit in the exact same plane without shading, which conceptually fits the single MPPT built into the EasySolar-II. Let’s see how that looks from the electrical side.
The array is allowed to have a maximum open circuit voltage (Voc) of 250V as per the EasySolar-II datasheet. Each panel has a 43.85V Voc at 25°C, which prevents me putting all panels in a single string. I am splitting the array into two strings, wired in parallel. That’ll be around 175.4V Voc comfortably under the limit.
While this array layout should be fine across relevant environmental condition ranges I want to be sure. The Voc changes with the cell temperature. The Nominal Operating Cell Temperature (NOCT) depends on the ambient temperature, solar irradiance and wind speed in combination with how the panels are mounted. Using the expected NOCT values in the Voc calculation will produce an estimate grounded in reality.
I got the minimum, maximum and mean monthly irradiance for the array location from the PVGIS monthly data. The
New European Wind Atlas provided mean (incl. standard deviation) and maximum surface level wind data. Plugging
those values into the pvlib Python library (or the noct_sam function more specifically) and
adding some iteration and formatting logic, I was able to model the expected NOCT values:
| Irradiance | Wind | -20 °C | -10 °C | 0 °C | 10 °C | 20 °C | 30 °C | 40 °C | 45 °C |
|---|---|---|---|---|---|---|---|---|---|
| December mean (143 W/m²) | Still (0.0 m/s) | -14.7 | -4.7 | 5.3 | 15.3 | – | – | – | – |
| December mean (143 W/m²) | Mean (3.9 m/s) | -17.7 | -7.7 | 2.3 | 12.3 | – | – | – | – |
| December mean (143 W/m²) | Mean + 1 std (5.4 m/s) | -18.1 | -8.1 | 1.9 | 11.9 | – | – | – | – |
| December mean (143 W/m²) | Max (17.6 m/s) | -19.2 | -9.2 | 0.8 | 10.8 | – | – | – | – |
| July mean (641 W/m²) | Still (0.0 m/s) | – | – | – | 33.7 | 43.7 | 53.7 | 63.7 | 68.7 |
| July mean (641 W/m²) | Mean (3.9 m/s) | – | – | – | 20.2 | 30.2 | 40.2 | 50.2 | 55.2 |
| July mean (641 W/m²) | Mean + 1 std (5.4 m/s) | – | – | – | 18.4 | 28.4 | 38.4 | 48.4 | 53.4 |
| July mean (641 W/m²) | Max (17.6 m/s) | – | – | – | 13.4 | 23.4 | 33.4 | 43.4 | 48.4 |
| July clear sky (873 W/m²) | Still (0.0 m/s) | – | – | – | 42.3 | 52.3 | 62.3 | 72.3 | 77.3 |
| July clear sky (873 W/m²) | Mean (3.9 m/s) | – | – | – | 23.9 | 33.9 | 43.9 | 53.9 | 58.9 |
| July clear sky (873 W/m²) | Mean + 1 std (5.4 m/s) | – | – | – | 21.4 | 31.4 | 41.4 | 51.4 | 56.4 |
| July clear sky (873 W/m²) | Max (17.6 m/s) | – | – | – | 14.6 | 24.6 | 34.6 | 44.6 | 49.6 |
Unsurprisingly, the panels are coldest in harsh winter winds with low irradiance (-19.2 °C) and hottest on scorching cloudless summer days without any wind (77.3 °C). I was surprised by the impact of wind though, the gap is larger than I expected.
Considering the 4-panel string Voc at each NOCT, the MPPT needs to be able to operate in a voltage range from 152.5V to 194.8V. With the defined maximum open circuit voltage all expected weather scenarios fit within the specification.
| Irradiance | Wind | -20 °C | -10 °C | 0 °C | 10 °C | 20 °C | 30 °C | 40 °C | 45 °C |
|---|---|---|---|---|---|---|---|---|---|
| December mean (143 W/m²) | Still (0.0 m/s) | 192.8 | 188.4 | 184.0 | 179.7 | – | – | – | – |
| December mean (143 W/m²) | Mean (3.9 m/s) | 194.1 | 189.8 | 185.4 | 181.0 | – | – | – | – |
| December mean (143 W/m²) | Mean + 1 std (5.4 m/s) | 194.3 | 189.9 | 185.5 | 181.2 | – | – | – | – |
| December mean (143 W/m²) | Max (17.6 m/s) | 194.8 | 190.4 | 186.0 | 181.6 | – | – | – | – |
| July mean (641 W/m²) | Still (0.0 m/s) | – | – | – | 171.6 | 167.2 | 162.8 | 158.4 | 156.2 |
| July mean (641 W/m²) | Mean (3.9 m/s) | – | – | – | 177.5 | 173.1 | 168.7 | 164.4 | 162.2 |
| July mean (641 W/m²) | Mean + 1 std (5.4 m/s) | – | – | – | 178.3 | 173.9 | 169.5 | 165.2 | 163.0 |
| July mean (641 W/m²) | Max (17.6 m/s) | – | – | – | 180.5 | 176.1 | 171.7 | 167.3 | 165.1 |
| July clear sky (873 W/m²) | Still (0.0 m/s) | – | – | – | 167.8 | 163.4 | 159.0 | 154.6 | 152.5 |
| July clear sky (873 W/m²) | Mean (3.9 m/s) | – | – | – | 175.9 | 171.5 | 167.1 | 162.7 | 160.5 |
| July clear sky (873 W/m²) | Mean + 1 std (5.4 m/s) | – | – | – | 177.0 | 172.6 | 168.2 | 163.8 | 161.6 |
| July clear sky (873 W/m²) | Max (17.6 m/s) | – | – | – | 180.0 | 175.6 | 171.2 | 166.8 | 164.6 |
The Battery
The battery capacity should be large enough to run basic services through a couple foggy days. I’m not entirely certain on what comprises base services though. Looking at the available Pylontech low voltage products, I was quick to decide on the biggest capacity within a single module. That would reduce setup complexity and support the inrush current of the inverter.
Additionally, Victron Energy and Pylontech list the products as compatible. They even have detailed battery compatibility information for Pylontech on their website.
A quick online search turns up many descriptions of monitoring and control integrations, also in combination with Victron products, which makes me confident enough that I’ll be able to build a satisfying monitoring solution out of these components.
The Wiring
The solar panels, battery connection and AC side all require different types of cables and have vastly different sizing requirements. I basically had no idea how to approach wire sizing before going into this endeavour.
For the solar panel connection, I learned to look for the expected voltage drop first. From the array voltage calculation above I know to plan for 150V to 195V. The panel data sheet tells me to expect a 13.55A maximum power current (Imp), which I double to 27.1A for the parallel strings. Over a generous 10m one way cable length estimate the Cable Voltage Drop Calculator tells me to expect a voltage drop of 0.86% on the coldest and 1.11% on the hottest days. That’s a good value. At my cable lengths the price difference between 4mm² and 6mm² conductor sizes was negligible, so I got 6mm² cables.
I am assuming a 27.1A load, because the battery charger is well capable of drawing whatever power the panels provide.
Moving on to connecting the battery to the EasySolar, I simply picked up the Pylontech US5000 battery cable pack. I remember being sceptic of the wire size, doing some research before and concluded that those are fine. I don’t remember why though. Looking at the specsheet I expect peak current of up to 200A, which would be too much for the cable. Later Dennis will have to reconsider that BEFORE installing the battery.
For the AC side I am mostly concerned with the connection from the inverter to the distribution panel. The EasySolar seems to be happy to provide 7kW for up to 1 minute. Better make sure the cable is rated for the peak power and not just rated continuous power. Yet again reaching for a cable size online calculator (german), and putting in 7kW at 230V AC over 1m yields 6mm² cross-section. From the main distribution I’ll break of 10-16A circuits each through 2.5mm² wiring.
Digital Equipment
Remote monitoring is the main purpose of the digital equipment at Château Voltaire. I want to log and see all solar production, battery charge levels and consumption metrics. In addtion there should be two surveillance cameras; one covering the property entryway including bicycle parking and the other one covering the shed’s doors.
I’ll get quite hand-wavy about software and networking specifics. I build custom software and operations infrastructure for a living and will figure things out. Also, I need to have a base to work on.
The Power
For each piece of equipment, I want to make sure that I am able to power it through direct DC, so it’s power source is independent of the EasySolar. As long as there’s charge in the battery, the equipment will run. For now, I’ll use ordinary 230V AC as the power source. A low power draw would be advantageous to keep the base load low and therefore the tolerance for foggy days high.
Everything that I need to run an ethernet cable to, I want to power through PoE. Something I have never done before. At first glance the PoE standards 802.3af and 802.3at are relevant for my application of cameras and whatever future equipment I’ll deploy. 25W of power should be enough for now and upgrading later is possible.
The Network
MikroTik gear piqued my interest quite a while back, finally I have an excuse to buy some.
The MikroTik CSS610-8P-2S+IN will be at the centre of the setup. The 8 gigabit PoE ports will power cameras and a modem (see below) with a total power budget of 140W. It can be powered via AC and migrating to 48V DC from the battery is possible through a barrel jack. Having a standard DC terminal block would have been nice. A barrel jack is just to easy to accidentally rip out.
A MikroTik KNOT Embedded LTE4 Global will act as the router and modem for the network. It will be powered via PoE through the switch, drawing 6W maximum. Configuration wise the router will connect to a WireGuard endpoint, which allows remote access.
Why not 5G? That’s mostly down to cost and power consumption. I want remote access, send monitoring data to a central server and pull the occasional surveillance clip, hardly anything that requires serious bandwidth. Despite the name Château Voltaire is located in Germany, which implies questionable data plans anyway. I’ll most likely go with a 40GB/month data plan through Blau that retails at 9,99€/month and is capped to 50 mbit/s. The bandwidth limitation is likely realistic for future commercial-scale solar setups while giving room to learn through suffcient data volume. The relvant MikroTik 5G products draw 10W maximum each, which is 67% increase over the KNOT at 4x the cost. That’s not worth the current use case.
Why not Starlink? As cool as unlimited data from space is, it also entails a higher ongoing cost and a ~10x power draw, too high to be viable all year round.
The Compute
A Dell OptiPlex 3050 running Talos Linux will be my compute platform. An i7 7500 with 8GB memory, a 128GB NVMe system drive and 500GB SATA SSD storage drive should be plenty. The storage SSD might need an upgrade for more CCTV footage. That’s an upgrade I rather shift into a time, where a 4TB SATA SSD costs less than the solar panels on the roof.
You might consider Kubernetes overkill for this setup. I work with Kubernetes daily for most production workloads, which makes the complexity overhead non-existent. Considering that the Château is a learning platform for later commercial-scale solar setups, I deem a setup easily extendable for fault tolerance a good choice.
The Cameras
I have basically no knowledge of CCTV equipment, but want something reasonably priced and working great with open source software like Frigate NVR. The Youtubes told me that Reolink cameras might be a good pick.
All devices that might fit what I need can be powered through the PoE standards that the MikroTik switch delivers.
About the future
I am excited to learn where my assumptions fall short, what I’ll be able to learn and how much of the newfound knowledge is applicable to commercial- or industrial-scale installations. If I manage to not electrocute myself, I might report back with learnings, follow-ups and ideas-meeting-reality stories…